Tuesday, May 31, 2011

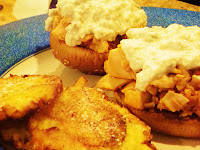
Buffalo Chicken Sliders

You know how I like my rotisserie chicken recipes. The week's that I buy a rotisseries chicken, I am guaranteed two easy dinners. This is one such week. With a full work schedule plus everyday activities and life with a 2-yr old, this is sometimes a must. Tonight's easy dinner: chicken sliders! I've never made these before, but my husband loves buffalo and blue cheese, so this is what I came up with.

The buffalo sauce I used is very mild because I literally have zero tolerance for spicy food...I'm talking I can't even eat medium salsa people. So, if you like spicy food, you could alter the recipe to use chili powder or cayenne powder...or just use your favorite hot sauce and skip the recipe altogether! It just so happens that nobody makes a mild buffalo sauce...I checked three grocery stores.

Buffalo Chicken Sliders
About 1/2 of a rotisseries chicken, shredded

For Buffalo Sauce (or use your favorite bottled hot sauce)
1/3 cup butter 
1/4 cup hot sauce
1/4 cup tomato sauce
1/2 tsp smoked paprika

4 oz. crumbled blue cheese
1/4 cup light mayo

Make the buffalo sauce my melting the butter and adding remaining ingredients in a small sauce pan over low heat. Don't cook too long. Toss with shredded chicken. In a small food processor, add the blue cheese and mayo and pulse until a thick, but creamy blue cheese sauce forms (it will be lumpy).

Assemble the sliders by topping the bottom bun half with a mound of the buffalo chicken, then pour blue cheese sauce as desired and top with other bun half. 

I served these with fried plantains (recipe here). 
Monday, May 30, 2011

Turkey Dogs with Avocado and Cotija

Okay, so admittedly two weeks ago I had never heard of cotija cheese. But then I was introduced to it in the kale salad recipe, and then again when browsing a cooking blog (here) I came across another idea for cotija cheese and it sounded simple but good. Hot dogs with avocado slices and cotija cheese. Well, it was indeed simple, but as my husband and I looked across the dinner table at one another our gaze suggested a longing for good old ketchup and mustard. Not that they weren't good, but if I am going to eat a hot dog, this fancy version would not be my first choice. Still a fun recipe, though.


Turkey Dogs with Avocado & Cotija
8 uncured turkey hot dogs
8 hot dog buns
2-4 oz. cotija cheese, crumbled (depending on how much you want on your dog)
1 ripe avocado, diced
Arugula pesto (recipe here)


Grill hot dogs and place in buns. Top with arugula pesto, cotija cheese and avocado pieces.   

Sunday, May 29, 2011

Portobello Mushroom Burger

Portobello mushrooms were on sale this week at Whole Foods, which prompted the idea of a mushroom burger. Why not? They were very easy to prepare and tasted delicious...even my husband, who does not like mushrooms really, liked the flavor...true, he struggled with the texture of the mushroom, but anyone who likes, or loves, mushrooms will love this burger! I would eat it just the same as a regular burger any day of the week. Chalk one up for fungus!

Portobello Mushroom Burger
4 portobello mushroom caps, stems removed and cleaned
1/4 cup olive oil
Salt and freshly ground black pepper
1/4 cup light mayonnaise
Arugula pesto (recipe follows)
4 T goat cheese
4 hamburger buns, split and toasted
2 red bell peppers (or you could use caramelized onions)

Preheat grill to medium-high heat. Spray with non-stick cooking spray.

Brush mushrooms caps with olive oil; sprinkle evenly with salt and pepper (both sides). Grill mushrooms, for 3-4 minutes on each side, or until tender (don't grill them too long, they will become mushy!).

Meanwhile, using either your oven or gas stove, roast the red peppers until charred. Place charred peppers in an ice bath until cool, remove skin, seeds and membranes, and slice. Make the arugula pesto (recipe below).

In a small bowl, combine mayonnaise, pesto, 1/4 teaspoon salt and 1/4 teaspoon pepper. Spread mixture evenly over cut sides of buns. Place mushroom caps on bottom half of bun, fill center with 1 T goat cheese each and top each evenly with red pepper. Cover with top bun half.

Arugula Pesto
2 cups arugula
1 lemon, juice and zest
1 T pine nuts
salt and pepper to taste
1/4 olive oil + more as needed

Combine all ingredients in a food processor and combine until well emulsified, adding more olive oil if needed. 

Friday, May 27, 2011

Shaved Asparagus Pizza

Full disclosure up front, I got this idea from a friend who posted it on Facebook after his wife made it, and it looked so good I followed the link to the original source...turns out she didn't think of this brilliant idea either, but it's still just as good! (http://smittenkitchen.com/2010/05/shaved-asparagus-pizza/)
Seriously, who would have thought of putting shaved asparagus on a pizza? In keeping with my cooking style, I did alter the recipe a bit. Below is how I prepared it:

Shaved Asparagus Pizza
1 package whole wheat pizza dough (I found one this week at Trader Joes for $.99!)
1/2 pound asparagus (thicker stalks are better than thin ones)
4 oz. peppered Parmesan cheese, grated (regular parm is fine too)
2 teaspoons black truffle oil (olive oil would be fine too)
kosher salt + several grinds black pepper to season
2 scallions, thinly sliced

Preheat your oven to the hottest temperature it goes, or about 500 deg F in most cases. If you use a pizza stone, as I do, you'll just have to wait to turn the oven on when you ready to put the stone in so you don't crack it.

To prepare asparagus: No need to snap off ends; they can be your “handles” as you peel the asparagus. Holding a single asparagus spear by its tough end, lay it flat on a cutting board and using a vegetable peeler (a Y-shaped peeler works best), create long shavings of asparagus by drawing the peeler from the base to the top of the stalk. Repeat with remaining stalks and don’t fret some pieces are unevenly thick (such as the end of the stalk, which might be too thin to peel); the mixed textures give a great character to the pizza. Discard tough ends. 

To assemble and bake pizza: Roll or stretch out your pizza dough to a 12-inch round. Sprinkle pizza dough with nearly all of the peppered Parmesan. Pile asparagus on top and grate what is left of the cheese on top. Sprinkle with salt and pepper and drizzle with truffle oil. 

Bake pizza for 10 to 15 minutes, or until edges are browned, the cheese is bubbly and the asparagus might be lightly charred. Remove from the oven and immediately sprinkle with scallions.

I have to note that shaving the asparagus was more time consuming than I anticipated. After the first few swipes, it gets kind of tricky to get a good strip off. I found that rotating the stalk around as I shaved off strips yielded more, otherwise since the stalks are thicker at the base and thin at the tip you run out of real estate, if you will. This is also why it's important to get the thicker stalks of asparagus versus the little skinny ones...those would have been a nightmare to shave, I imagine.  

Thursday, May 26, 2011

Curried Chicken Wrap & Kale Salad

The wrap is an easy dinner idea to use rotisseries chicken. I had leftover chicken from the ginger peanut dish earlier this week, so a quick dinner idea was to turn it into curried chicken and stuff it in a wrap with mixed greens. Nothing special there. But. The kale salad. SO good. Remember my post about end of year luncheons? Well this year, at the same luncheon I took the ham and cheese quiche, a friend brought this kale salad and it was unbelievably good. I've only had kale cooked (either baked or sauteed), and never gave any thought to eating it raw. This recipe will change your mind about eating kale raw, or eating kale at all for that matter.

Curried Chicken Wrap
2 cups shredded rotisserie chicken
1/4 cup light mayo
1 tsp curry powder
1/4 tsp kosher salt + 1/8 tsp fresh ground black pepper
2 celery stalks, chopped
2-3 scallions, chopped
Whole wheat wraps
Mixed salad greens

In a large bowl, combine the chicken through scallions. Refrigerate up to a day, or serve once it's prepared. I typically make this kind of thing the afternoon before serving it for dinner (or the morning before serving it for lunch)...usually a few hours in the refrigerator will give the flavors time to marry. Serve the chicken mixture in a wrap with a few salad greens. 

Kale Salad
1 bunch of kale, separated from stems and torn into pieces
1/4 cup olive oil
1/4 cup pine nuts
2 oz. cotija cheese, crumbled
1/4 cup dried cranberries, diced


Place the kale pieces in a large bowl and set next to the stove for quick access. Heat the olive oil in a heavy bottomed skillet over high heat. As soon as the oil begins to ripple a bit, gently add the pine nuts and swirl the pan constantly as they brown, about 30 seconds. It is very easy to burn these, so make sure the skillet is constantly swirling...also the oil is very hot and will pop so watch out!


As soon as the pine nuts begin to brown, immediately remove from heat and pour the entire contents of the skillet over the kale. Quickly toss, over and over, to coat and wilt the kale, about a minute straight. 


Toss in the cheese and cranberries and serve immediately. PS, this dish is not good leftover, so plan to consume it all. 


The cotija cheese is a Mexican cheese, akin to queso fresco. It crumbles well and does not really melt...exactly what you want for this recipe. 

Wednesday, May 25, 2011

Strawberry-Kiwi Green Salad

Spring is finally here and Summer is already knocking on the door, which equates to a plethora of fresh fruit available at the grocery store. I decided to toss some fresh strawberries and kiwi with salad greens to accompany a dinner of salmon cakes and beet risotto with goat cheese. It was very refreshing and a nice departure from the usual suspects of a typical dinner salad. 

Strawberry-Kiwi Green Salad
Mixed salad greens
1/2 cup sliced strawberries
2 kiwi, peeled and thinly sliced
1/4 cup toasted, slivered almonds
1 T raspberry preserves (pretty much any fruit preserve would work here)
1 T olive oil
1 T red wine vinegar
Salt & pepper to taste

Combine the greens, strawberries, kiwi and almonds in a large bowl. In a small bowl, whisk together the preserves, olive oil and red wine vinegar. Season to taste with salt and pepper and whisk until emulsified.

Pour the dressing over the green mixture and toss until well coated.  

Beet Risotto with Goat Cheese

My sister passed along this recipe to me after trying it, and loving it. I'm not sure where she got it, so other than stating it's not wholly my own creation I can't give any other credit. I made a few alterations (wild rice instead of Arborio, prepared beets, and the cooking method), and it was quite good. If you're not a fan of beets or are looking for a way to incorporate (and by that I mean hide) them into your kids' food, this is a good one. My 2 yr old ate the risotto AND the goat cheese. What kind of 2 yr old eats goat cheese and asks for more? Mine, apparently. 

Beet Risotto with Goat Cheese
¼ cup butter
2 medium beets, diced (I bought beets already peeled at Whole Foods)
1 medium onion, diced
1 cup wild rice
Salt & pepper, to taste
1 T balsamic vinegar
4 cups Chicken Broth
Goat Cheese, to crumble over risotto (about 1/3-1/2 cup)

Melt the butter over medium heat in a heavy-bottomed saucepan. Add the beets and onion, and cook for 10 minutes (stir to allow the onion to caramelize). Mix in the rice and balsamic vinegar and continue cooking for about 2 minutes. Meanwhile, heat chicken broth in a small saucepan over low heat. 

Add the broth 1-2 ladles at a time and stir, allowing the rice to absorb most of the moisture before adding more broth. Stir occasionally. Keep repeating until all of the broth is used and the rice is cooked. It will take about 45 minutes to go through all of the broth.

Season with salt and pepper. Sprinkle with the goat cheese, and serve. 

I served this dish with salmon cakes and a green salad (recipe in concurrent post for today). The goat cheese is a perfect pairing with the slightly sweet beets and nutty, creamy wild rice. 


Tuesday, May 24, 2011

Ginger Peanut Noodles

I have had a pad thai recipe in the works because it is my latest craving, but I am having some difficulty in locating all of the unique ingredients (i.e. tamarind pulp). I know, it's New York City, what gives? What gives is that I live on the Upper West Side and don't have the time or desire to schlep to Chinatown to a good Asian market, and regular grocery stores are so small up here, there would rarely be shelf room dedicated to strictly Asian cooking ingredients. Where am I going with this? Well, to satisfy my pad thai craving, sort of, I threw together a ginger peanut dish and served it with the spring rolls I made here. So easy and so good. I think this dish took me 20 minutes start to finish, including time to bring the water up to a boil for the noodles!

Ginger Peanut Noodles
12 oz. whole wheat linguine (rice noodles would have been great too)
1 cup water
1/2 cup peanut butter
3 T rice vinegar
3 T soy sauce (I use reduced sodium)
1 T grated fresh ginger root
1 red bell pepper, sliced and roughly chopped
1/4 cup scallions, chopped
1/4 cup roasted peanuts, finely chopped

Cook the pasta according to package directions. After draining, return pasta to the same cooking pot but off the heat. Meanwhile, in a food processor, combine the water through ginger root and process until smooth. Pour the sauce over the noodles and stir well (you may not need all of the sauce, so pour slowly and stop when you've reached your desired coating).

Satuee the red pepper slices briefly in a skillet coated with cooking spray, about 2-3 minutes just to soften them slightly. Remove from heat and toss with noddles. Stir in the scallions just before serving. Top each portion with a tablespoon of chopped peanuts. 

Monday, May 23, 2011

Hiatus

Notice the lack of posts this month? Have I been cooking less? Yes and no. Our house has been turned upside down over the last month or so with me starting back to work and dealing with first trimester sickies (thankfully into the second trimester now)...so I have been cooking a bit less (full disclosure I have had a bowl of cereal for dinner on more than one occasion), but also I have reverted to my old reliable meals and have not tried anything new lately out of sheer exhaustion and lack of time to go to he grocery store or search for good recipes. 

My three part time jobs plus caring for my son full time has taken its toll, not to mention the new tummy dweller! I hope to be back on top of my game soon...my sister has forwarded me some excellent recipes lately, so I hope to try those and get them posted. Teaser: think beets!

Hope to be back on the blog soon!

Ashley  

Wednesday, May 18, 2011

Ham and Cheese Quiche

It's that time of year for End of the Year Luncheon's and what is more fitting, or easy, than a quiche? This is literally the easiest thing you can throw together the morning of a brunch or luncheon. True, I use a store bought pie crust, but that is primarily because I don't keep shortening in my house and most good crust recipes call for cutting in shortening. Hey, at least the homemade version is not any more healthy for you than the store-bought, unlike many of its processed counterparts. On to the recipe:

Ham and Cheese Quiche
1 pre-made pie shell (in your grocer’s freezer) 
5 jumbo eggs (or 6 large eggs) 
1 1/4 cups heavy cream 
1 cup diced ham (from the deli section) 
1/4 cup diced onion 
1/2 tsp dried thyme
salt and pepper to taste
1 cup freshly grated sharp cheddar cheese 

Preheat oven to 375 deg F. Take the pie shell out of the freezer. 

Sauté onions with ham over medium heat in a a skillet with a drizzle of canola oil, for about 5 minutes. Add the thyme and cook an additional minute. Remove from heat.

Meanwhile, whisk together the eggs and heavy cream and season with salt and pepper. Make sure the mixture is well combined. Shred the cheese into the bottom of the pie shell. Pour sauted ham and onions on top of the cheese and spread out evenly across the pie shell. Pour the egg mixture over the top (careful not to overfill it, better to leave a bit behind than have it overrun in your oven). 

Bake 35-45 minutes until set and lightly browned on top. (When you take the quiche out of the oven, the middle of the pie should not jiggle). 

Sunday, May 15, 2011

Smoked Paprika Macaroni and Cheese

Smoked paprika is my new obsession. I have always heard about how good it is, but have never been able to find it in the grocery store. My husband found some in TJ Maxx, go figure. It is SO good, and a little goes a long, long way. It's this slightly sweet, very smoky, not spicy but chili flavor. Yum. I have been using it recently when seasoning meat for enchiladas, taco salads, etc. Today, I decided to make mac'n'cheese with it. Even my 2-year old approved! Seriously, it makes regular paprika seem like cardboard seasoning. 

Smoked Paprika Macaroni and Cheese
12 oz. penne pasta (or elbow or rotini, or whatever you like)
1 T butter
1 T white whole wheat flour (you can use all purpose)
1/2 tsp smoked paprika (you could even use less)
salt and pepper to taste
3/4 - 1 cup milk, depending on consistency
4 oz. shredded cheddar cheese (although had I any smoked gouda, wow that would have been good)

Make pasta according to package directions and set aside (by the way, if you need a mac'n' cheese short cut, Ronzoni has these awesome new "pasta portions" where the noodles cook in 3 MINUTES. Shout out to my sister, who works for that pasta company for an awesome time saving product! Go packaging science).

Heat a medium saucepan over medium heat and melt the butter. Whisk in the flour until smooth, add the paprika and salt and pepper and continue to whisk for about 30 seconds. Slowly add the milk, whisking continuously until a thick sauce forms. You may not need the entire cup of milk. Add the shredded cheese and stir just until the cheese melt. Toss with cooked pasta and serve. 

Monday, May 9, 2011

Dino Cupcakes!

Today is my son's 2nd birthday, so my husband and I decided to make his birthday cake a dinosaur...and we decided to make it easy by making it out of cupcakes! Historically, we have had trouble with a basic vanilla cupcake recipe. Any other cupcake variety or muffin is perfect, but for some reason when we make vanilla cupcakes, they explode in the oven and ooze everywhere. We have literally tired recipes from cupcake books (Hello Cupcake), Martha Stewart, Billy's and Magnolia Bakeries here in NYC, etc. They all turn out the same. I do have my suspicions that it has something to do with our no-name, cruddy oven that came with the apartment, because frankly we didn't have these troubles before moving here 2 1/2 years ago...but that doesn't matter because this is the oven I have to use to make my son's birthday cupcakes! So. One last try for a different recipe...

I came across this website (http://annies-eats.com/) and decided her recipe looked good because it is a thick batter. I only slightly adapted it (omitted the vanilla bean), but it basically remains hers. The result? Better. Still a few sugar clumps that burst near the top, but really masses better than our previous attempts. And once we iced them, perfect! I think I will be sticking with this one, thanks Annie!

Vanilla Cupcakes
3 cups cake flour
1 tbsp. baking powder
½ tsp. salt
16 tbsp. unsalted butter, at room temperature
2 cups sugar
5 large eggs, at room temperature
1¼ cups buttermilk, at room temperature
1 tbsp. vanilla extract

Preheat the oven to 350° F.  Line two cupcake pans with paper liners.  Set aside.

In a medium mixing bowl, combine the cake flour, baking powder and salt.  Whisk together and set aside.  Add the butter to the bowl of an electric mixer fitted with the paddle attachment.  Beat on medium-high speed for 2 minutes, until light and creamy in color.  Scrape down the sides of the bowl and beat for one more minute.

Add the sugar to the butter mixture, ¼ cup at a time, beating 1 minute after each addition.  Mix in the eggs one at a time until incorporated.  Scrape down the sides of the bowl after each addition.  Combine the buttermilk and the vanilla extract in a liquid measuring cup.  With the mixer on low speed, add the dry ingredients alternately with the wet ingredients, beginning and ending with the dry ingredients and mixing just until incorporated.  Scrape down the sides of the bowl and mix for 15 seconds longer.

Divide the batter between the prepared paper liners, filling each about 2/3 of the way full (you will likely have batter left over after filling 24 wells.)  Bake 18-22 minutes, or until a toothpick inserted in the center comes out clean.  Allow to cool in the pans 5 minutes, then transfer to a cooling rack to cool completely.  Replace paper liners and bake remaining batter if desired. 

Frost cooled cupcakes as desired (Buttercream Icing recipe here).